· 11 min read
Wrap Text in LaTeX Tables
Learn how to wrap text in LaTeX tables using various methods, including the p{} command, array package, and tabularx package.

In LaTeX tables, wrapping text ensures better readability, especially when dealing with long text entries or narrow columns. Without wrapping, text might overflow, disrupting the layout and making it hard to read. Proper text wrapping helps maintain the table’s structure, ensuring that information is presented clearly and concisely.
By default, LaTeX doesn’t automatically wrap text within table cells, which often leads to content spilling out of the cell boundaries. This can result in misaligned tables, unreadable text, and a messy document layout. Handling long text in tables requires manually setting column widths and ensuring that cells can handle text wrapping.
In this tutorial, I’ll explain in detail about how to wrap text in Latex tables.
1. Basic Table Structure in LaTeX
In LaTeX, tables are commonly created using the tabular environment. It allows you to define rows, columns, and cell alignment, but by default, it does not handle text wrapping within cells. Each column is defined by specifying alignment (l, c, or r for left, center, or right alignment) and separating entries with &. Rows are separated by \\, and the \hline command is used to create horizontal lines.
You can explore more about LaTeX table formatting in the Overleaf documentation.
Basic Structure Example:
\begin{tabular}{|c|c|c|}\hlineColumn 1 & Column 2 & Column 3 \\\hlineData 1 & Data 2 & Data 3 \\\hline\end{tabular}This example creates a simple table with three centered columns, each separated by vertical lines (|). You can learn more about basic table creation in the LaTeX Tables Wikibook.
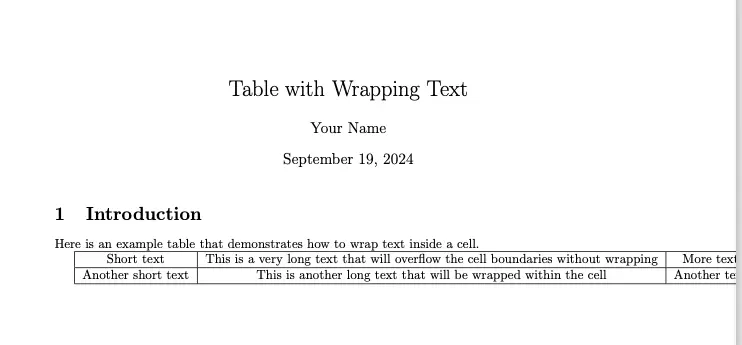
Example of Text Overflow in a Basic LaTeX Table
When adding long text into table cells without wrapping capabilities, LaTeX will not automatically break the lines. This results in text overflowing beyond the cell boundaries, leading to poorly formatted tables.
Example:
\begin{tabular}{|c|c|c|}\hlineShort text & This is a very long text that will overflow the cell boundaries without wrapping & More text \\\hline\end{tabular}In this case, the table columns will overflow, causing the table to look distorted. This is a common issue when trying to fit large amounts of text in narrow columns.
2. Wrapping Text with the p{} Command
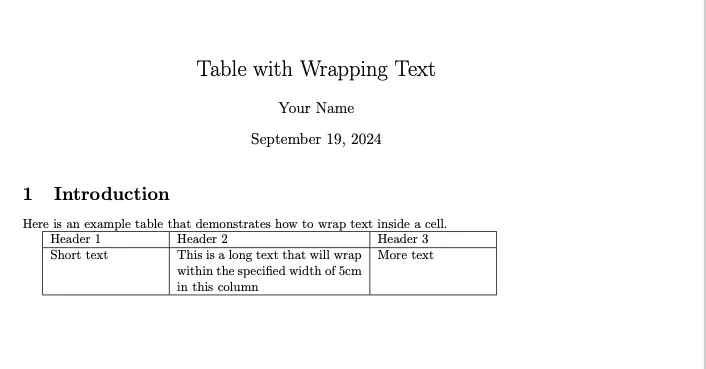
In LaTeX, the p{} command is used to set a fixed column width, which automatically enables text wrapping within that column. Unlike the default column types (l, c, r), which simply align text without managing overflow, the p{} option defines the width of a column and ensures that any text exceeding that width wraps to the next line, keeping the table neat and readable.
To use the p{} command, you need to define the column width in curly brackets (e.g., p{3cm}). This tells LaTeX to wrap text within the specified width, regardless of the content length. It’s particularly useful for tables with narrow columns or where long entries must fit within the table boundaries.
Example:
\begin{tabular}{|p{3cm}|p{5cm}|p{3cm}|}\hlineHeader 1 & Header 2 & Header 3 \\\hlineShort text & This is a long text that will wrap within the specified width of 5cm in this column & More text \\\hline\end{tabular}In this example, the second column is set to a width of 5 cm, ensuring that the long text will wrap within that width instead of overflowing. The other columns, set to 3 cm, also wrap text accordingly if needed.
While the p{} command is effective for simple text wrapping, it comes with certain limitations. The main advantage is its ease of use and the ability to define consistent column widths across the table. This method is ideal when you need basic control over table column size and want to avoid text overflow issues.
However, the fixed column width can sometimes be restrictive, especially in tables with varying content lengths. For instance, if the text in one column is much shorter than in others, the width defined by p{} may leave too much unused space, affecting the table’s overall layout. Additionally, unlike other packages like tabularx (which adjusts column widths dynamically), the p{} command does not adapt to different content lengths automatically.
You can explore more details on the usage of the p{} command and its variations in the Overleaf documentation and the LaTeX Wikibook.
3. Using the array Package for More Control
The array package gives more flexibility for table formatting in LaTeX, allowing custom column types that enhance control over text alignment and wrapping. By combining the p{} command for fixed-width columns with alignment commands, you can manage how text behaves within each column.
For more information, refer to the array package documentation.
To use this, include the array package in the preamble:
\usepackage{array}You can customize column alignment while maintaining text wrapping. For example, using the >{\RaggedRight} command (from the ragged2e package) with p{} ensures that text wraps and is left-aligned:
\begin{tabular}{|>{\RaggedRight}p{4cm}|>{\RaggedRight}p{4cm}|}\hlineLong Text 1 & Long Text 2 \\\hlineWrapped text aligned to the left & Another long text, also wrapping within 4 cm \\\hline\end{tabular}This method provides control over both the width and alignment. However, managing multiple customizations may require fine-tuning.
4. Multi-row and Multi-column Text Wrapping
To handle text wrapping in multi-row and multi-column cells, use the multirow and multicolumn commands in LaTeX. These commands allow you to merge cells across rows or columns and control text alignment and wrapping within these cells.
For more details on these commands, refer to the LaTeX documentation: multirow package and multicolumn command.
Using multirow:
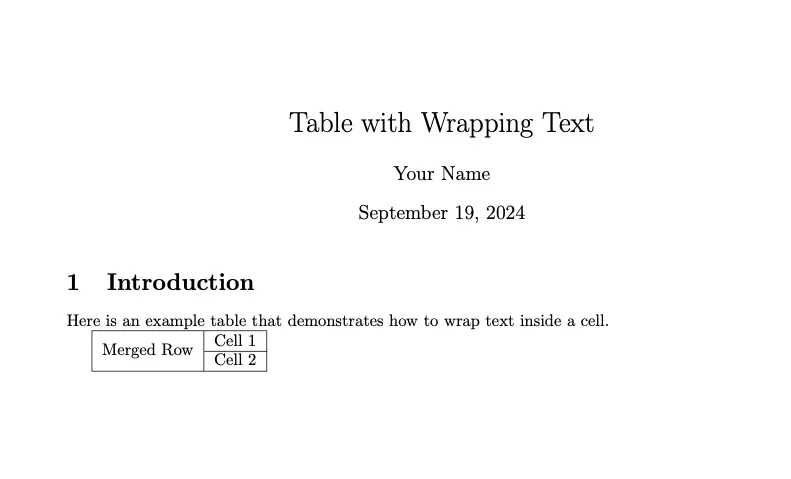
The multirow package enables you to merge multiple rows into a single cell. Here’s an example:
\usepackage{multirow}
\begin{tabular}{|c|c|}\hline\multirow{2}{*}{Merged Row} & Cell 1 \\\cline{2-2} & Cell 2 \\\hline\end{tabular}
In this example, “Merged Row” spans two rows, and the cells below it are adjusted accordingly.
Using multicolumn:
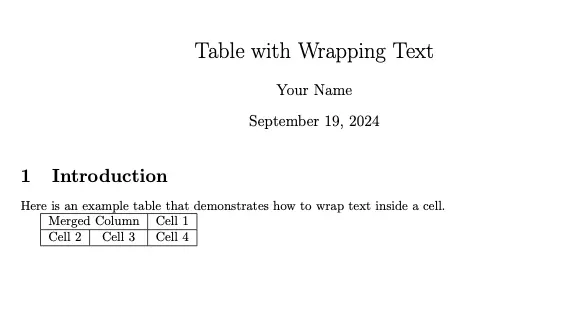
The multicolumn command lets you merge multiple columns into a single cell. For instance:
\begin{tabular}{|c|c|c|}\hline\multicolumn{2}{|c|}{Merged Column} & Cell 1 \\\hlineCell 2 & Cell 3 & Cell 4 \\\hline\end{tabular}Here, “Merged Column” spans two columns, affecting the layout of the table.
Text Wrapping:
To ensure text wraps properly in these merged cells, adjust the column width or use the p{width} specifier for fixed-width columns:
\begin{tabular}{|p{3cm}|p{3cm}|}\hline\multirow{2}{*}{Long text that wraps} & Another cell \\\cline{2-2} & More text \\\hline\end{tabular}In this example, setting a fixed width helps manage text wrapping inside the merged cell.
5. Wrapping Text with the tabularx Package
The tabularx package in LaTeX enhances table formatting by automatically adjusting column widths to fit text within the page margins, ensuring proper text wrapping.
Unlike traditional fixed-width tables where columns are manually set, tabularx offers a dynamic approach to column width management.
For further details, refer to the tabularx package documentation.
To use tabularx,
- include the package in your document with
\usepackage{tabularx}. - Define your table with the
tabularxenvironment, specifying a total table width. - Within the table, use the
Xcolumn type to indicate columns that should stretch to fit the available space. This flexibility ensures text wraps neatly within the column, improving readability.
Here’s a basic example:
\documentclass{article}\usepackage{tabularx}
\begin{document}
\begin{table}[h]\centering\begin{tabularx}{\textwidth}{|X|X|}\hlineHeader 1 & Header 2 \\\hlineThis is a long text that will automatically wrap within the cell to fit the column width. & Another long text that will also wrap accordingly to fit the column width. \\\hline\end{tabularx}\caption{Example table using tabularx for text wrapping}\end{table}
\end{document}
In this example, \textwidth specifies that the table should use the full width of the page. Both columns are set to adjust dynamically, so the text wraps within the given width.
This approach provides a cleaner look compared to fixed-width tables where text might overflow or result in awkward spacing.
Using tabularx is advantageous over fixed-width tables because it eliminates the need for manual adjustments and ensures that tables remain well-formatted even when content changes. This results in more adaptable and aesthetically pleasing documents.
6. Wrapping Text in Long Tables Using the longtable Package
The longtable package in LaTeX is designed to manage large tables that span multiple pages. This package is particularly useful when dealing with extensive data where you need to maintain table formatting and structure across different pages.
For more detailed information, refer to the longtable package documentation.
To use longtable, include the package in your LaTeX document with \usepackage{longtable}. The longtable environment operates similarly to the tabular environment but can handle table data over multiple pages seamlessly. For text wrapping, combine longtable with column specifiers that automatically adjust, such as p{width} or X from the tabularx package.
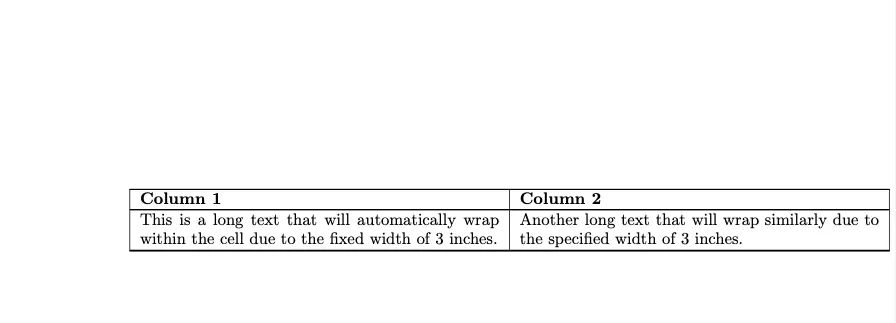
Here’s a basic example of using longtable with text wrapping:
\documentclass{article}\usepackage{longtable}\usepackage{tabularx}
\begin{document}
\begin{longtable}{|p{3in}|p{3in}|}\hline\textbf{Column 1} & \textbf{Column 2} \\\hline\endfirsthead
\hline\textbf{Column 1} & \textbf{Column 2} \\\hline\endhead
\hline\endfoot
\hline\endlastfoot
This is a long text that will automatically wrap within the cell due to the fixed width of 3 inches. & Another long text that will wrap similarly due to the specified width of 3 inches. \\\hline\end{longtable}
\end{document}
In this example, p{3in} is used to define column widths that allow text to wrap automatically within each cell. The longtable environment ensures that the table continues across pages while maintaining the specified formatting.
For best results when combining longtable with text wrapping, follow these practices:
- Define Column Widths Appropriately: Use the
p{width}specifier for columns where text wrapping is needed, ensuring the width is sufficient for your content. - Maintain Consistent Formatting: Use
\endfirsthead,\endhead,\endfoot, and\endlastfootto manage header and footer rows that repeat on each page, keeping the table organized and readable. - Combine with Other Packages: If additional functionality is needed, consider integrating
longtablewith packages likegeometryto adjust page margins orarrayfor advanced column formatting.
7. Handling Special Characters and Text Overflow in LaTeX Tables
When working with tables in LaTeX, special characters and text overflow can pose challenges. Special characters such as &, %, #, _, and ^ have specific meanings in LaTeX and need to be handled carefully to avoid compilation errors or formatting issues.
For more details on handling special characters, refer to the LaTeX Special Characters Guide.
To manage special characters and control text overflow, consider these strategies:
Escape Special Characters: Use a backslash (
\) to escape special characters within table cells. For example, to include an ampersand in a cell, write\&.Manual Line Breaks: To manually control where text wraps within a cell, use
\newlineor\\commands. These commands force a line break, allowing you to format the content precisely.
Here’s an example demonstrating how to handle special characters and manually control text wrapping in a LaTeX table:
\documentclass{article}\usepackage{array}
\begin{document}
\begin{tabular}{|l|l|}\hline\textbf{Special Character} & \textbf{Description} \\\hlineAmpersand & \texttt{This is an ampersand: \&. Use a backslash to escape it.} \\\hlinePercent Sign & \texttt{The percent sign: \%. It denotes a comment in LaTeX.} \\\hlineHash Symbol & \texttt{The hash symbol: \#. It is used in LaTeX commands.} \\\hlineUnderscore & \texttt{The underscore: \_. It is used for subscripts.} \\\hlineCaret & \texttt{The caret: \^. It is used for superscripts.} \\\hline\end{tabular}
\end{document}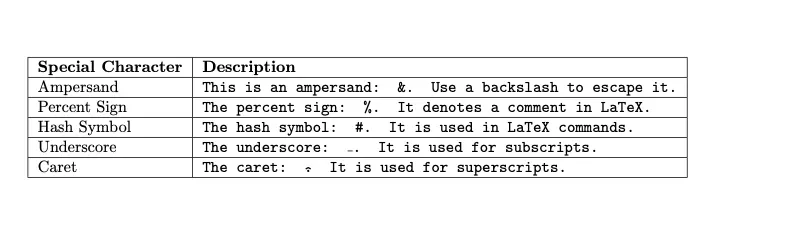
In this example:
- Special characters are included using appropriate escape sequences.
By following these practices, you can ensure that special characters are displayed correctly and that text within your tables is formatted to fit neatly, avoiding overflow issues.
Conclusion
In LaTeX, effectively managing text within tables involves choosing the right methods for wrapping text and handling large datasets. Here’s a summary of key techniques and best practices:
Using the
tabularxPackage: For dynamic column widths and improved text wrapping within fixed-width tables, thetabularxpackage is ideal. It adjusts column widths automatically to fit the page, ensuring that text wraps neatly without manual adjustments. This method is best for tables where columns need to adapt to content length.Employing the
longtablePackage: When dealing with extensive tables that span multiple pages, thelongtablepackage excels. It manages large tables across pages while preserving formatting and structure. Combininglongtablewith column specifiers likep{width}allows for controlled text wrapping, making it suitable for lengthy tabular data.Handling Special Characters and Text Overflow: Special characters require careful handling using escape sequences to prevent compilation errors. For text overflow within cells, manual line breaks with
\newlineor\\can control where text wraps, giving you precise control over cell content.
Selecting the appropriate method depends on your document’s specific requirements. By leveraging these tools and techniques, you can create well-formatted, readable tables that enhance the presentation of your LaTeX documents.