· 11 min read
Insert Code In Latex Document With Indentation
Learn how to insert code into LaTeX documents with proper formatting and indentation using verbatim, listings, and minted packages. Customize code appearance, manage long code listings, and improve readability with syntax highlighting and advanced formatting options.

LaTeX is a widely used typesetting system, especially popular in academic and technical fields for its precision in formatting complex documents. When writing papers, reports, or technical documentation, including code with proper formatting and indentation is essential for readability and professionalism. Well-structured code in LaTeX helps readers follow along and understand algorithms or functions clearly.
To insert code into LaTeX documents, several tools and packages are available. The simplest is the verbatim environment, while more advanced options like the listings and minted packages offer syntax highlighting, indentation control, and enhanced readability features.
In this tutorial, I’ll explain how to insert code into LaTeX documents with proper indentation using different tools. You’ll learn how to use the verbatim environment for basic formatting and the more advanced listings and minted packages to achieve syntax highlighting, indentation control, and improved readability.
Using the verbatim Environment
The verbatim environment in LaTeX, as described in the LaTeX documentation, provides a straightforward way to display code or plain text exactly as it is written. This environment preserves spaces, indentation, and special characters, making it ideal for including simple code snippets or other text that requires precise formatting.
Despite its simplicity, the verbatim environment comes with some limitations.
- It does not offer syntax highlighting, which means the code will appear in plain text without color coding or style changes based on the programming language.
- It lacks advanced formatting features, such as line numbering or the ability to control tab spaces or indentation size.
This makes it less suited for large or complex code listings where readability and visual clarity are crucial.
Here’s an example of how to insert a Python code snippet using the verbatim environment:
\begin{verbatim}def example(): print("Hello, World!")\end{verbatim}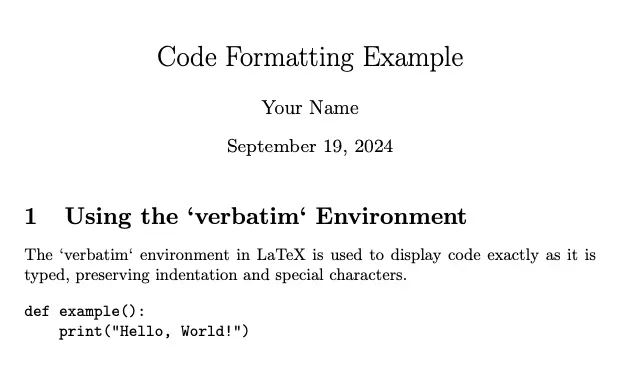
The code will be displayed exactly as written, with indentation and spaces preserved. However, for more complex formatting and better presentation, you’ll likely need a more advanced package, such as listings or minted.
Using the listings Package
The listings package, detailed in the LaTeX documentation, is a versatile tool for displaying code in LaTeX documents. Unlike the simpler verbatim environment, listings supports various features, such as:
- Syntax highlighting for different programming languages.
- Automatic indentation that preserves the structure of the code.
- Customizable options for fonts, colors, and line numbering.
This flexibility makes it ideal for technical papers, reports, and documentation where well-formatted code is essential.
To use the listings package, include it in your LaTeX document. If it’s not already installed, you can add it via your LaTeX distribution, or include the following command in your document preamble:
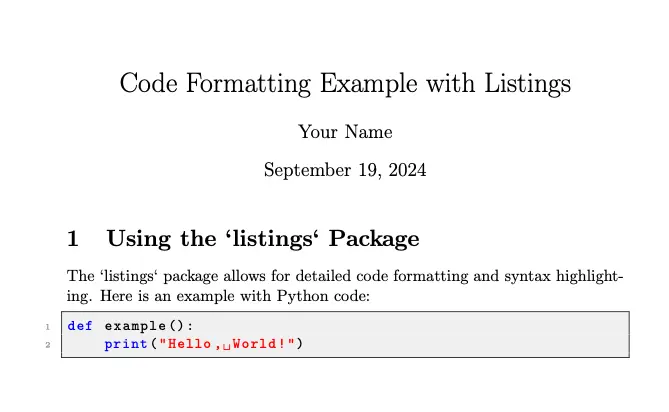
\usepackage{listings}Once the package is loaded, you can define the language for syntax highlighting. Here’s an example for a Python code block:
\usepackage{listings}\lstset{language=Python}\begin{lstlisting}def example(): print("Hello, World!")\end{lstlisting}This will be rendered as:
- The
\lstset{language=Python}command specifies Python as the language for syntax highlighting. - The
lstlistingenvironment automatically formats the code with correct indentation and highlighting.
The listings package supports a wide range of languages, including:
- Python
- Java
- C
- HTML
- SQL
To use a different language, adjust the language parameter:
\lstset{language=Java}Additionally, the listings package offers a variety of customizable options to improve the appearance of your code:
- Colors and Fonts:
- Change the background color, font style, or size.
- Example:\lstset{backgroundcolor=\color{gray!10},basicstyle=\ttfamily\footnotesize}
- Line Numbers:
- Add line numbers for better readability:\lstset{numbers=left}
- Add line numbers for better readability:
These options allow you to tailor the code formatting to fit the overall style of your document, making listings an excellent choice for professional, readable code in LaTeX.
Customizing the listings Output
Customizing the output of the listings package in LaTeX allows you to fine-tune how your code is presented.
This is especially useful for improving readability and ensuring that your code adheres to specific formatting guidelines.
The listings package provides extensive options for adjusting indentation, tabs, spacing, line numbers, and background colors. Detailed customization makes the code easier to follow, especially in technical or academic documents.
Adjusting Indentation, Tabs, and Spacing:
By default, the listings package uses a fixed tab size, but you can modify it to match your preferred indentation style. For instance, if you want to change the tab size to 4 spaces, use the following command:
\lstset{tabsize=4}- Tab size: This command sets the number of spaces used for each tab character. Increasing or decreasing the value of
tabsizeadjusts the width of indentation in the displayed code. - Spaces instead of tabs: To ensure consistent indentation, you can configure
listingsto use spaces instead of tab characters. This setting can be combined with thetabsizeoption to control how many spaces are inserted for each tab character.
Here’s an example of using spaces instead of tabs:
\lstset{tabsize=4, showspaces=true, showtabs=false}In this configuration, LaTeX will insert spaces instead of tab characters, ensuring the code indentation remains consistent across different platforms and editors. You can also visualize spaces with the showspaces option.
Adding Line Numbers and Background Color:
To enhance code readability, particularly in longer code blocks, you can enable line numbering and add a background color to the code snippet. Line numbers help readers refer to specific sections of code, while a subtle background color improves contrast between the code and the surrounding text.
Line numbers: Line numbers can be added to the left or right side of the code. Here’s an example that places line numbers on the left:
\lstset{numbers=left}This option is useful for documents that include code analysis or step-by-step explanations, allowing readers to easily refer to specific lines of code.
Background color: Adding a background color can improve the visual presentation of the code. A light gray background, for instance, helps distinguish the code from the surrounding content without distracting the reader.
\lstset{backgroundcolor=\color{gray!10}}This command applies a light gray background to the code block. You can adjust the intensity by modifying the percentage value (e.g.,
gray!20for a darker shade).
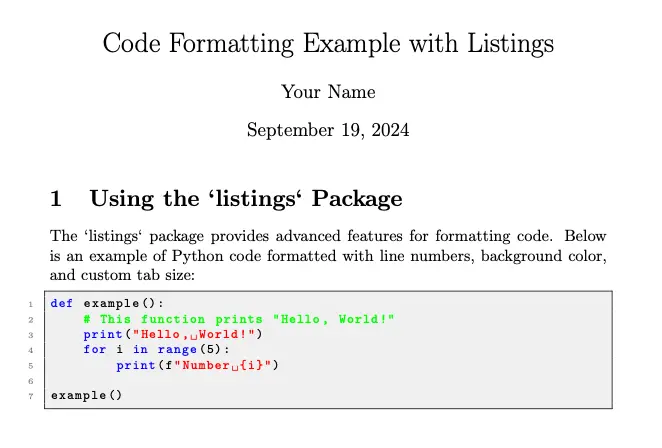
A combined example of adding line numbers and a background color might look like this:
\lstset{numbers=left, backgroundcolor=\color{gray!10}, tabsize=4}In this configuration:
- Line numbers are displayed on the left side of the code.
- The background color is set to a light gray to make the code block stand out.
- Tab size is set to 4 spaces, ensuring consistent indentation.
This will be rendered as:
These customization options offer significant flexibility in presenting code clearly and effectively in LaTeX. For more advanced settings and additional features, you can explore the full range of options in the official listings package documentation.
Using the minted Package for Better Syntax Highlighting
The minted package is a powerful tool for inserting code into LaTeX documents with advanced syntax highlighting capabilities. It uses the Pygments library, an external tool for syntax highlighting, which supports a wide variety of programming languages and offers more flexible and visually appealing code formatting than the listings package.
With minted, you can apply different syntax highlighting styles, customize the appearance of code, and manage code formatting more easily, making it a superior option for code-heavy documents.
Why Use the minted Package?
minted stands out for several reasons:
- Rich syntax highlighting: It provides detailed and customizable syntax highlighting for numerous programming languages.
- Customization flexibility: You can easily change styles, colors, and other formatting options to match your document’s aesthetic.
- Wide language support: Like
listings,mintedsupports various programming languages, but with better syntax precision and more style options thanks to Pygments.
Setting Up the minted Package:
Using minted requires the installation of the Pygments library. Since Pygments is an external Python-based tool, you must enable shell escape in your LaTeX setup to allow the compiler to call Pygments when generating the document. This is done by passing the -shell-escape flag when compiling.
Install the
mintedpackage by including it in the document preamble:\usepackage{minted}Enable shell escape in your LaTeX compiler:
- In most LaTeX environments, use the following compilation command:
Terminal window pdflatex -shell-escape yourfile.tex
- In most LaTeX environments, use the following compilation command:
Basic usage example:
\begin{minted}{python}def example():print("Hello, World!")\end{minted}
In this example:
- The
mintedenvironment is used with Python as the specified language. - Pygments handles the syntax highlighting automatically, applying colors and formatting based on Python’s syntax.
Customization Options in minted
minted offers numerous options for tailoring the appearance of your code:
- Syntax highlighting styles: You can choose from various predefined styles (e.g.,
friendly,monokai,colorful). Here’s how to apply a specific style:\usemintedstyle{monokai} - Line numbering: Just like with
listings, you can add line numbers to your code:\begin{minted}[linenos]{python}def example():print("Hello, World!")\end{minted} - Code formatting: You can adjust the font size, background color, or frame around the code block. For example, to apply a background color:\begin{minted}[bgcolor=gray!10]{python}def example():print("Hello, World!")\end{minted}
These options allow fine control over how your code appears in the document, making it more readable and visually appealing.
Comparison with listings:
While the listings package is effective for basic code inclusion, minted offers several advantages:
- Better syntax highlighting:
mintedleverages Pygments, which provides more accurate and visually rich syntax highlighting. - Customization:
mintedoffers greater flexibility with style choices, background colors, and detailed formatting options. - Appearance: Code rendered with
mintedoften looks cleaner and more professional, especially in large technical documents.
However, minted has some trade-offs:
- It requires external dependencies (Pygments and Python), which makes setup more complex than
listings. - Shell escape must be enabled for
mintedto function, which may not be supported in all LaTeX environments.
In conclusion, while both minted and listings are useful for displaying code in LaTeX documents, minted excels in terms of syntax highlighting and customization. If you need a polished, professional look for your code, and can handle the extra setup, minted is the superior choice.
Handling Long Code Listings
Handling long code listings in LaTeX requires careful formatting to ensure that the code remains readable and well-organized. The listings package provides several techniques to manage long code blocks, including options for wrapping lines, pagination, and including external files.
Using the breaklines Option: The breaklines option allows you to automatically wrap long lines of code so that they fit within the width of the page.
This is particularly useful for preventing horizontal scrolling and ensuring that long lines are displayed in a readable format. To enable line wrapping, use the following command:
\lstset{breaklines=true}- Automatic wrapping: This ensures that lines of code that exceed the page width are broken and wrapped onto the next line, making the code easier to read without horizontal scrolling.
Managing Pagination for Lengthy Code Segments: For very long code segments that span multiple pages, LaTeX needs to handle pagination effectively. The listings package doesn’t natively handle pagination for code blocks, but you can use the longlisting environment from the longlisting package or manually split code into sections. To manage lengthy code segments, you can also use the lstlisting environment along with additional tools or custom commands.
Including External Files as Code Listings: If your code is stored in external files, you can include these files directly in your LaTeX document. This approach is useful for keeping the LaTeX source file clean and for managing large code bases more effectively. To include an external file, use the \lstinputlisting command:
\lstinputlisting{filename.py}- File inclusion: This command inserts the content of
filename.pyinto your document, applying the same formatting and syntax highlighting options as defined for thelistingsenvironment. This method is beneficial for incorporating larger code files without cluttering your LaTeX source.
These techniques help maintain code readability and manage large code blocks efficiently in LaTeX documents.
Tips and Best Practices for Code Formatting in LaTeX
When formatting code in LaTeX, following best practices ensures clarity and consistency in your documents. Here are key tips to optimize your code presentation:
Choosing the Right Package: Select the appropriate package based on your project’s requirements. Use
verbatimfor simple, unformatted code snippets. For enhanced features like syntax highlighting and customization,listingsis suitable. If advanced syntax highlighting and styling are needed, opt forminted, which leverages Pygments. Assess your needs for syntax support, appearance, and external dependencies when making your choice.Ensuring Readability: Proper indentation and spacing are crucial for readability. Use the
tabsizeoption inlistingsor configuremintedto maintain consistent indentation throughout your code. Properly formatted code is easier to follow and reduces errors in understanding.Maintaining Consistency: Keep the font size and style of your code consistent with the rest of the document. Adjust settings in
listingsormintedto match the document’s main text style. For example, usebasicstyleinlistingsorfontsizeinmintedto align the code appearance with your document’s typography.Using Comments and Labels: Incorporate comments and labels within code listings to aid navigation and understanding. Comments can explain complex sections or indicate key parts of the code. Labels help in referencing specific code sections when discussing or analyzing code within the document.
Implementing these practices will enhance the readability and professional appearance of your code in LaTeX documents.
Conclusion
In this article, we’ve explored several methods for inserting and formatting code in LaTeX. Here’s a brief summary of the key points:
- Using the
verbatimEnvironment: Ideal for simple, unformatted code blocks but lacks syntax highlighting and advanced formatting options. - Using the
listingsPackage: Provides versatile features like syntax highlighting, automatic indentation, and customization options. It’s suitable for most code formatting needs and supports a variety of languages. - Using the
mintedPackage: Offers superior syntax highlighting and customization thanks to Pygments. It requires additional setup, including enabling shell escape, but provides more visually appealing and precise code formatting.
When selecting the right tool, consider your project’s requirements for syntax highlighting, code readability, and customization. For basic needs, verbatim might suffice. For more advanced formatting and highlighting, listings and minted are better choices.
Experimenting with both listings and minted will help you find the best solution for your LaTeX documents, ensuring that your code is presented clearly and professionally.