· 10 min read
How to Change the Font in LaTeX Document
LaTeX offers various methods for changing fonts, including predefined commands, font packages, and the fontspec package for custom fonts. Choose the right font for your document's purpose and audience to enhance readability and aesthetic appeal.

LaTeX uses Computer Modern as its default font, designed specifically for high-quality typesetting. While this font is widely recognized for its clarity and professionalism, customizing fonts can significantly enhance the readability and aesthetic appeal of your documents. Custom fonts allow you to match the style of your document to its purpose, whether it’s a formal report, a scientific paper, or a creative work.
By utilizing packages such as fontspec, you can easily incorporate a variety of fonts, including those installed on your system, making your documents visually distinct and engaging.
In this tutorial, I’ll explain how to effectively change and customize fonts in LaTeX to enhance the presentation of your documents.
Changing the Font Size
LaTeX offers various font size options to control text appearance. These options range from very small to very large:
\tiny\scriptsize\footnotesize\small\normalsize(default)\large\Large\LARGE\huge\Huge
You can apply these sizes either globally or locally. Global font size changes are set in the \documentclass declaration. For example, to apply a 12pt font size throughout the entire document, use:
\documentclass[12pt]{article}This setting affects the document’s default font size, but local changes can override it for specific sections or blocks of text. To change the font size locally within the document, enclose the text in curly braces and apply the size command:
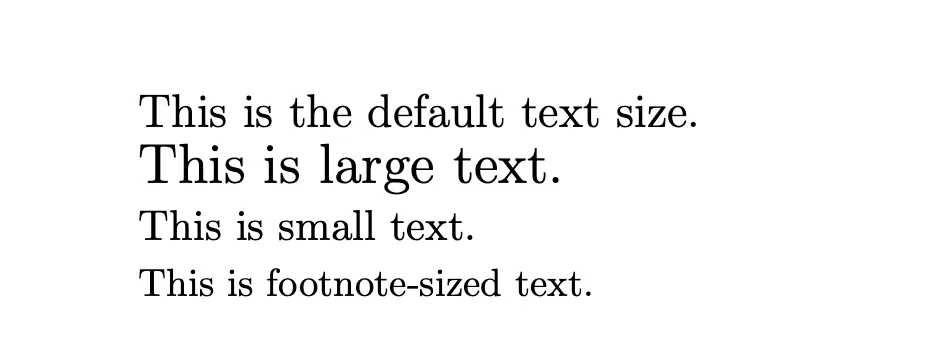
{\large This is large text.}An example document illustrating different font sizes is as follows:
\documentclass[12pt]{article}
\begin{document}
This is the default text size.
{\large This is large text.}
{\small This is small text.}
{\footnotesize This is footnote-sized text.}
\end{document}
Which will be rendered as:

This method is helpful for adjusting the size of individual elements without altering the entire document’s appearance. By using local size changes, you can emphasize headings, captions, or specific paragraphs while keeping the rest of the text consistent.
Changing the Font Family
In LaTeX, you can change the font family both globally (for the entire document) and locally (for specific sections or text) using document class option as \documentclass[sans]{artcile}.
The three main font families in LaTeX are:
- Serif: The default font family, used for formal and printed documents.
- Sans-Serif: A modern, clean font, often used in presentations and technical documents.
- Monospace: A fixed-width font, commonly used for code and technical content.
To apply these font families globally, you can use packages that change the default font for the entire document. For instance:
- Serif (default): No additional package is needed as it is the default font family.
- Sans-Serif: Use the
sansoption in the\documentclassdeclaration:\documentclass[sans]{article} - Monospace: Use the
\usepackage{courier}to change the entire document to a monospace font:\usepackage{courier}
For local font changes, you can use commands to switch the font family for specific parts of your text:
- Serif:
\textrm{} - Sans-Serif:
\textsf{} - Monospace:
\texttt{}
Example of a local change to sans-serif for specific text:
\textsf{This is sans-serif text.}You can mix global and local changes to create a document with a consistent style while customizing certain sections. For instance, you may want the main text to use a serif font, but display code blocks in monospace:
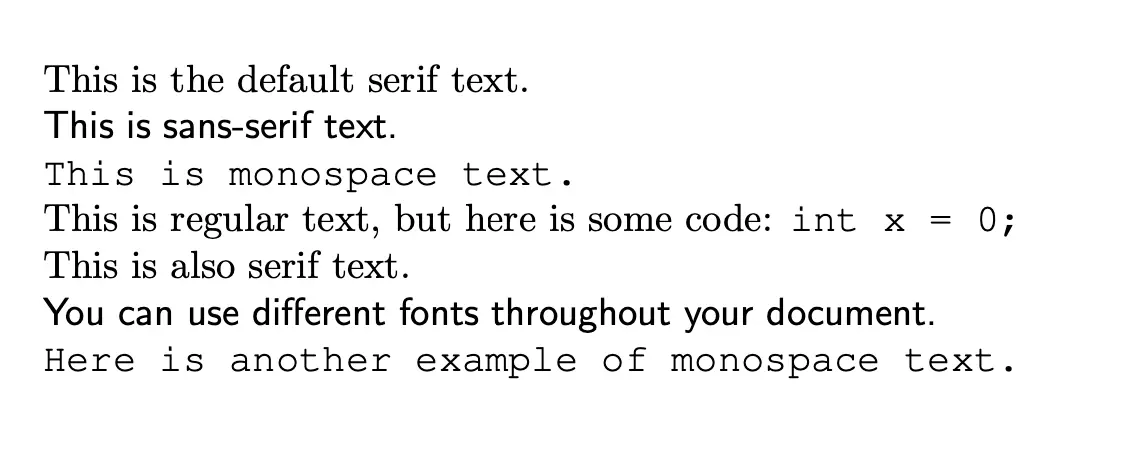
This is regular text, but here is some code: \texttt{int x = 0;}An example document illustrating different font families is as follows:
\documentclass[sans]{article} % Change the entire document to sans-serif font\usepackage{courier}           % Use the courier package for monospace font
\begin{document}
This is the default serif text.
\textsf{This is sans-serif text.}
\texttt{This is monospace text.}
This is regular text, but here is some code: \texttt{int x = 0;}
\textrm{This is also serif text.}
\textsf{You can use different fonts throughout your document.}
\texttt{Here is another example of monospace text.}
\end{document}
Which will be rendered as:

By combining document-level and local changes, you can create visually appealing and functional documents tailored to the content’s needs.
Using Font Packages
LaTeX makes it easy to switch fonts by using font packages. These packages offer predefined fonts that can be applied globally (for the entire document) or locally (to specific sections), depending on your needs.
By incorporating font packages, you can quickly change the style of your document without manual adjustments. Some of the most popular font packages include:
times: Provides the Times New Roman font, a widely used serif font, ideal for formal documents like reports or research papers.helvet: Loads the Helvetica font, a clean sans-serif typeface, often used in presentations or modern technical documents.courier: Switches to the Courier font, a monospaced typeface perfect for displaying code, tables, or technical text.
To apply these fonts globally, you simply load the desired font package in your document’s preamble. For example, to set Times New Roman as the default font for your entire document:
\usepackage{times}This ensures that all the text in your document uses Times New Roman unless overridden by local font changes. You can similarly apply Helvetica or Courier by loading their respective packages:
\usepackage{helvet} % for Helvetica\usepackage{courier} % for CourierIf you need to apply a different font to just a specific part of the document, you can still use the default font globally and change fonts locally using commands like \textsf{} (for sans-serif) or \texttt{} (for monospace). For example, if you’re using the Times font package globally but want a section in Helvetica, you can apply it like this:
This is in Times, but \textsf{this part is in Helvetica}.An example document illustrating different font packages is as follows:
\documentclass{article}\usepackage{times}    % Use Times New Roman as the default font\usepackage{helvet}   % Load Helvetica font package\usepackage{courier}  % Load Courier font package
\begin{document}
This is in Times New Roman, which is the default font for this document.
This part remains in Times, but \textsf{this part is in Helvetica}.
Here is some code in Courier: \texttt{int main() \{ return 0; \}}.
You can switch back to Times for more text: This is still in Times.
\end{document}
which will be rendered as:

By combining global and local font changes, you can achieve a consistent overall design while customizing individual sections as needed. This flexibility allows for a polished and professional appearance while meeting the specific typographic requirements of your document.
Custom Fonts with fontspec (XeLaTeX and LuaLaTeX)
The fontspec package allows you to use custom TrueType and OpenType fonts in your LaTeX documents, but it requires either XeLaTeX or LuaLaTeX compilers, as traditional LaTeX does not support these modern font formats. With fontspec, you can easily access system-installed fonts and apply them to your document, giving you greater control over typography.
To use custom fonts, first include the fontspec package in your preamble:
\usepackage{fontspec}Once the package is loaded, you can set the main font for the entire document with the \setmainfont command. For example, to use Arial as the primary font:
\setmainfont{Arial}This command globally applies the Arial font throughout the document. However, fontspec also allows you to assign different fonts to specific text elements like serif, sans-serif, and monospace. You can use the following commands to customize different sections of your text:
- Serif font:
\setmainfont{Times New Roman} - Sans-serif font:
\setsansfont{Helvetica} - Monospace font:
\setmonofont{Courier New}
For example, to apply a different font to a portion of text while keeping the rest of the document in Arial:
This is in Arial, but \textsf{this part is in Helvetica}.An example document illustrating custom fonts in LaTeX is as follows:
\documentclass{article}\usepackage{fontspec} % Load the fontspec package for font customization
\setmainfont{Arial}          % Set Arial as the main font for the document\setsansfont{Helvetica}      % Set Helvetica for sans-serif font\setmonofont{Courier New}    % Set Courier New for monospace font
\begin{document}
This is in Arial, which is the default font for this document.
This text is in Arial, but \textsf{this part is in Helvetica}.
Here is some code in Courier: \texttt{int main() \{ return 0; \}}.
You can switch back to the main font: This is still in Arial.
\end{document}
Which will be rendered as:

With fontspec, you can mix and match fonts throughout your document, giving you a high degree of flexibility in font customization. Whether you’re using custom fonts for aesthetic reasons or to meet specific formatting requirements, this package makes it easy to incorporate professional-looking typography into your LaTeX projects.
Changing Font in Specific Sections
In LaTeX, you can modify the font style for specific sections, subsections, and headings to create a more customized look. One popular way to do this is by using the titlesec package, which provides a simple interface to control the formatting of section titles, including font size, weight, and family.
To modify the appearance of section headings, you first need to load the titlesec package in your document’s preamble:
\usepackage{titlesec}Once the package is loaded, you can customize the format of section titles. For example, to make section titles appear in a large, bold, sans-serif font, you can use the following command:
\titleformat{\section}{\Large\bfseries\sffamily}{\thesection}{1em}{}Here’s a breakdown of what each part does:
\section: Specifies that you’re modifying the format of section titles.\Large: Sets the font size for the section title.\bfseries: Makes the section title bold.\sffamily: Changes the font family to sans-serif.\thesection: Inserts the section number before the title.1em: Adds space between the section number and the title.
This will apply the specified formatting to all section titles throughout the document. Similarly, you can modify the appearance of subsections and other heading levels by replacing \section with \subsection, \subsubsection, etc.
By using the titlesec package, you can easily customize the look of headings to match the overall style of your document, making it more visually appealing and organized.
Advanced Font Customization
LaTeX allows for fine control over typography, enabling you to customize text with a variety of font attributes. You can adjust font shape, weight, style, and more to enhance the visual structure of your document. Here are several ways to achieve advanced font customization:
You can change the font shape to italic, bold, or small caps using the following commands:
\textit{italic text}, \textbf{bold text}, \textsc{small caps}To apply multiple attributes at once, simply combine them. For example, to make text both bold and italic:
\textbf{\textit{bold and italic text}}You can mix different font attributes across sections or even within the same text, giving you granular control over how your text is displayed. LaTeX defaults to regular or bold weights, and you can use the \textbf{} command for bold text:
\textbf{Bold text}For italics or slanted text, use:
\textit{Italic text}, \textsl{Slanted text}To emphasize text, you can use \emph{} to create emphasis, which typically results in italicizing but can change depending on context:
\emph{Emphasized text}You can switch to small caps using \textsc{}. Additionally, to change letter case, you can use commands like \uppercase and \lowercase:
\textsc{Small Caps}, \uppercase{Uppercase text}, \lowercase{lowercase text}For underlining text, LaTeX uses the \underline{} command:
\underline{Underlined text}To create strikethroughs, load the ulem package:
\usepackage{ulem}\sout{Strikethrough text}To achieve old-style (or text) numbers, which are typically used for a more classic look, you can use specific fonts that support this feature, like the fontspec package:
\usepackage{fontspec}\setmainfont[Numbers=OldStyle]{Times New Roman}An example document illustrating font styles in LaTeX is as follows:
\documentclass{article}\usepackage{ulem}       % Load ulem package for strikethrough\usepackage{fontspec}   % Load fontspec package for font customization
\setmainfont{Times New Roman} % Set the main font for the document
\begin{document}
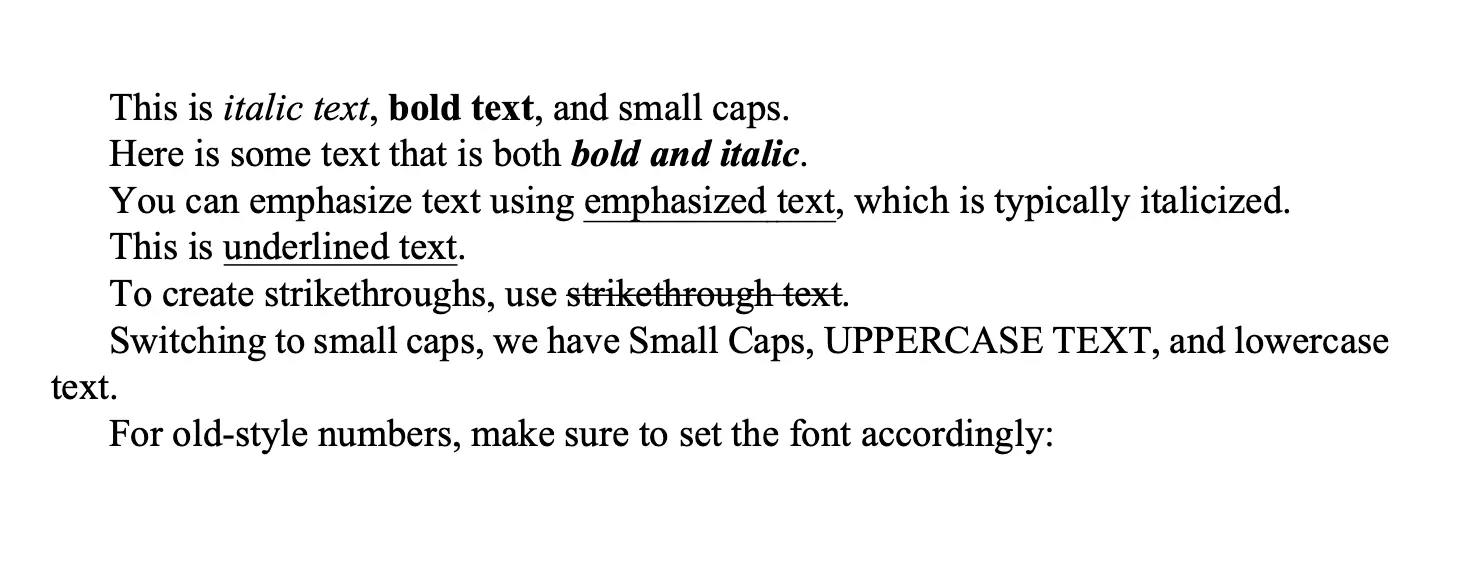
This is \textit{italic text}, \textbf{bold text}, and \textsc{small caps}.
Here is some text that is both \textbf{\textit{bold and italic}}.
You can emphasize text using \emph{emphasized text}, which is typically italicized.
This is \underline{underlined text}.
To create strikethroughs, use \sout{strikethrough text}.
Switching to small caps, we have \textsc{Small Caps}, \uppercase{Uppercase text}, and \lowercase{lowercase text}.
For old-style numbers, make sure to set the font accordingly:\setmainfont[Numbers=OldStyle]{Times New Roman}
\end{document}
Which will render as:

By combining these customization options, you can fine-tune the appearance of your text to fit the aesthetic and functional needs of your document, giving you full control over how your content is presented.
Conclusion
In LaTeX, various methods exist for changing fonts, each suited for different needs:
- Changing Font Size: Use predefined commands like
\tiny,\small,\large, etc. - Switching Font Families: Load packages such as:
timesfor Times New Romanhelvetfor Helveticacourierfor Courier
- Using
fontspec: Incorporate custom TrueType and OpenType fonts with XeLaTeX or LuaLaTeX. - Advanced Customization: Modify font shapes, weights, and styles using commands like
\textit{},\textbf{}, and\textsc{}.
When choosing the right font for your documents:
- Academic Documents: Prefer serif fonts (e.g., Times New Roman, Computer Modern) for readability and formality.
- Professional Documents: Use sans-serif fonts (e.g., Helvetica) for a modern and clean appearance.
- Creative Documents: Explore custom fonts while ensuring they remain legible.
By applying these strategies, you can effectively tailor the typography of your documents to suit their purpose and audience.